Translating Therefore™ Objects
Categories and case definitions can contain multiple custom translations.
The translation shown to users is based on their client’s language settings. If no translation is available to match the client UI language the default system language is displayed.

|
Only translations for languages supported by the Therefore™ UI can be entered. |
Adding translations to a category or case definition
-
Open the category or case definition. Right-click on an empty part of the dialog, then select Language. The side menu will open, showing which languages are currently available. Select Translation to open the translation dialog.
-
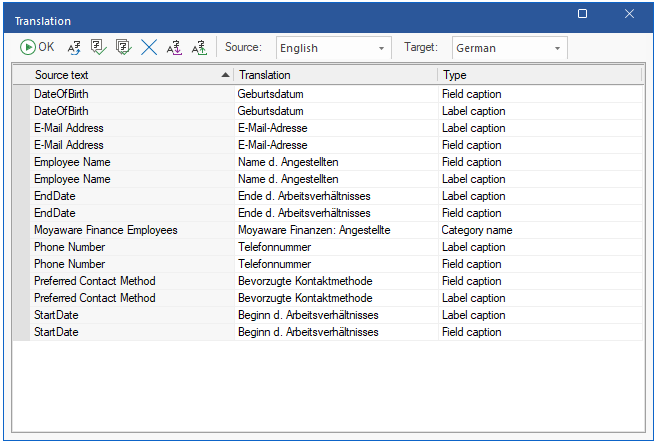
Select the Source language, which will serve as a reference for translation. Then select your Target language. The column Source Text shows the texts in the source language. The column Type tells you where the text is used, for example in a field caption, label caption, category name, or category description. Enter the translation for each text in the Translation column.

-
Since field and label captions are often the same, many entries are listed twice. Use the auto-translate function to avoid entering the same text twice. Enter the translation for one type, then select the empty fields and click the Auto-Translate button at the top. Automatically translated fields are marked in green.
Note: The auto-translate function also works across separate categories or cases, so translating additional objects becomes easier.
-
Check any automatically translated items. Then click the green check mark at the top to check whether your translations fit into the original's label fields. If all translated terms will fit without being cut off, the message "No issues found" is displayed. If a translated term is too long for its label, a warning is displayed.
-
Save your changes when done. To check your translation, right-click on the category, expand the Language option, and select your new language. The category dialog will be displayed in the chosen language.
Deleting a translation
To delete a language, open the translation dialog, select a target language, and click the Delete icon. This will clear the Translation column. The deleted language is removed from the list of available languages in the category or case context menu.
Translating Objects Externally
It's possible to export objects and send them to a third party for translation, and later import the completed translation.
-
Open the translation dialog and choose the target language to export. Click the 'Export' button in the top menu to export a Unicode file which can be sent for translation.
-
To import a translation, open the translation dialog and choose the target language to import. Click the 'Import' button in the top menu and choose the translated file. A dialog informing how many translations were successfully imported or failed to import appears.

|
Translations from a Unicode text file can only be imported on the same system from which they were exported. |
To view and manage all translations in the repository, click the 'Translate' icon in the header menu of the Therefore™ Solution Designer.