Developing a New Azure Function
Although there are many languages and tools to choose from, this guide only discusses how to create Azure functions using C# in Visual Studio. This is the recommended way as Azure functions can be tested and debugged locally without the need for an Azure subscription just by pressing F5. It is also possible to deploy it to Azure from within Visual Studio.
Make sure you have installed Visual Studio with the “Azure development” workload.
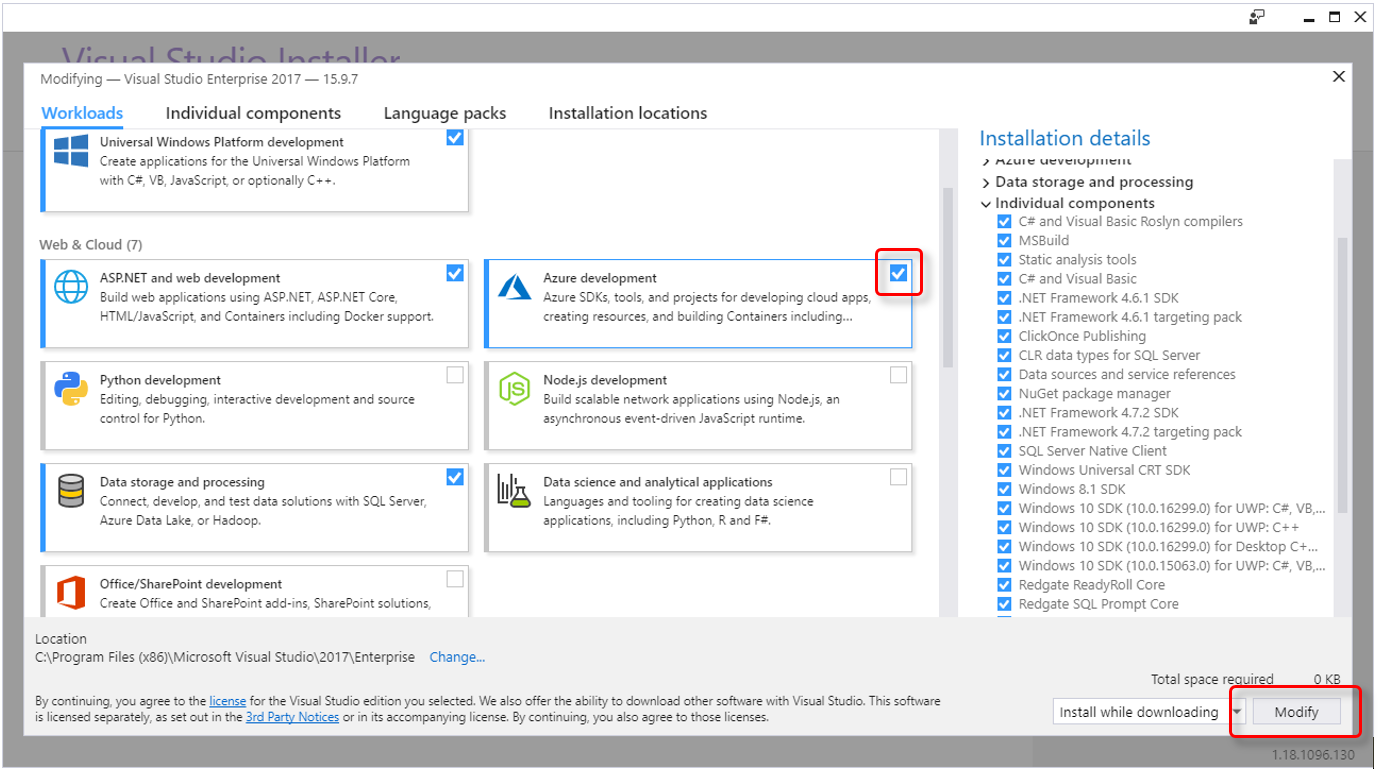
In Visual Studio, click on the “Tools” menu and then “Get Tools and Features…” to open the installer.
Open the “Workloads” tab and look for “Azure development”. Activate the checkbox on the top-right and click “Modify” to apply the changes.
Creating a new Azure function
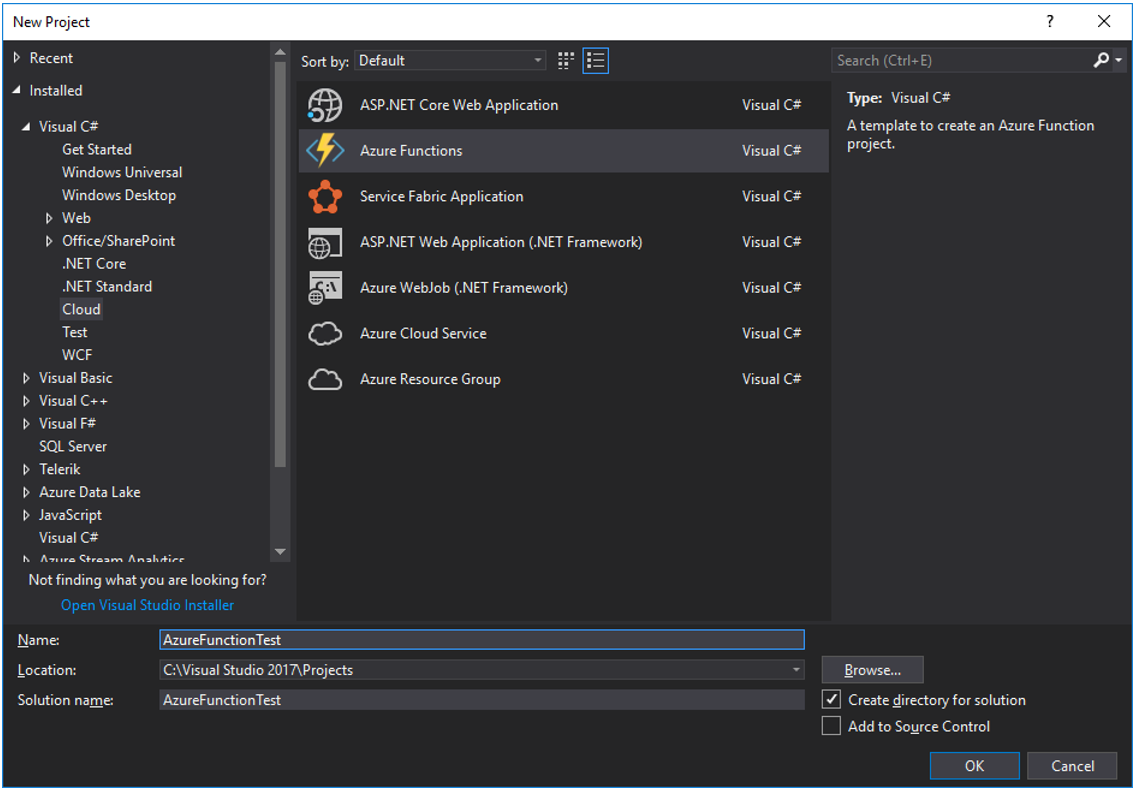
If the “Azure development” workload was successfully installed, “Azure Functions” will be one of the options when creating a new project in Visual Studio. It is however recommended to start from the “EmptyFunctionApp” sample, instead of starting development from scratch.
Make sure to select 'Azure Functions v2' (as “v1” will be discontinued at some point) and 'Http trigger', as Therefore™ currently only supports calling Azure functions using HTTP(S) requests.
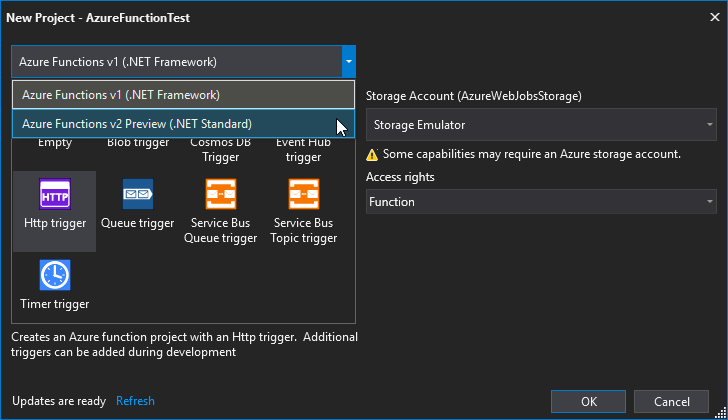
Access rights will only be applied when the function is published, not for local development. When choosing “Anonymous”, no key will be required. “Function” will require the function key, while “Admin” will require the Function App key. The master key could be used, as well.
Using REST for Web API calls
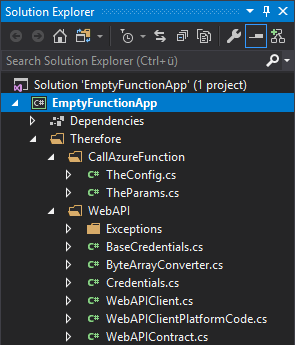
Add the “Therefore” folder from the 'EmptyFunctionApp' sample to your project.
The files are not required, but make development simpler.
If changes in the Web API require the 'WebAPIContract.cs' to be updated, follow these steps:
-
Download and install Silverlight SDK 5.0 or later
-
Make sure the XML Service is running
-
Create a temporary folder e.g. 'C:\WebAPI'
-
Open a CMD line and go to 'C:\Program Files (x86)\Microsoft SDKs\Silverlight\v5.0\Tools'
-
Execute the following command:
CopySlSvcUtil.exe http://servername:8000/theservice/v0001?singlewsdl /out:C:\WebAPI\WebAPIContract.cs /config:C:\WebAPI\output /namespace:http://schemas.therefore.net/webservices/interop/v0001/types,Therefore.WebAPI -
Go to 'C:\WebAPI' and copy the 'WebAPIContract.cs' to the 'Therefore\WebAPI' folder, replacing the old one.
As described in the sample project, the 'SendRequest' function of the 'Therefore.WebAPI.WebApiClient' class, can be used to send a request. For a list of all available commands, please see the Web API documentation.
Using the 'WebAPIContract.cs' will require 'NuGet' pack
Using SOAP for Webt API Calls
Add the “Therefore” folder from the 'EmptyFunctionApp' sample to your project and then delete the 'WebAPI' sub folder as it is only required for REST calls. As using SOAP is not the recommended way, the value for 'UseREST' in 'TheConfig' class needs to be set to 'false', otherwise the 'WebAPIBaseUrl' property will be wrong.
Add Therefore™ Web API as a Connected Service:
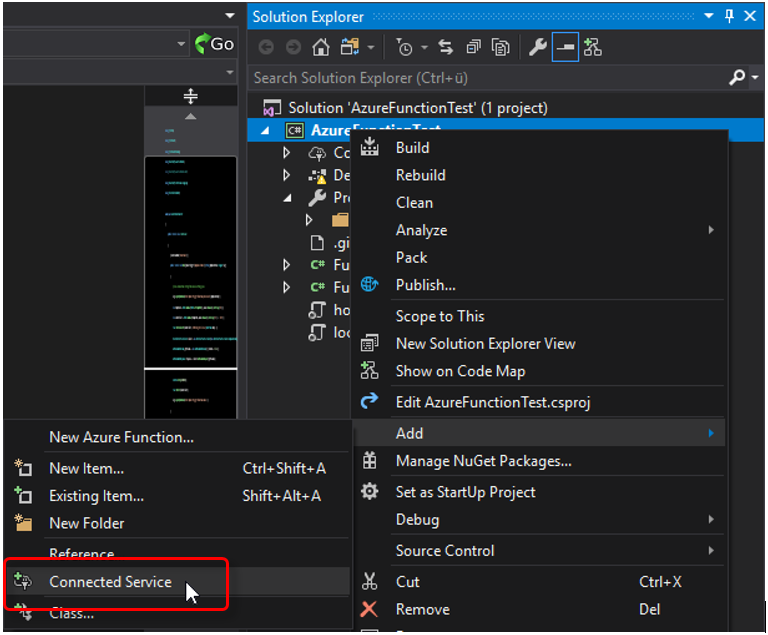
As Connected Service, choose 'Microsoft WCF Web Service Reference Provider'.
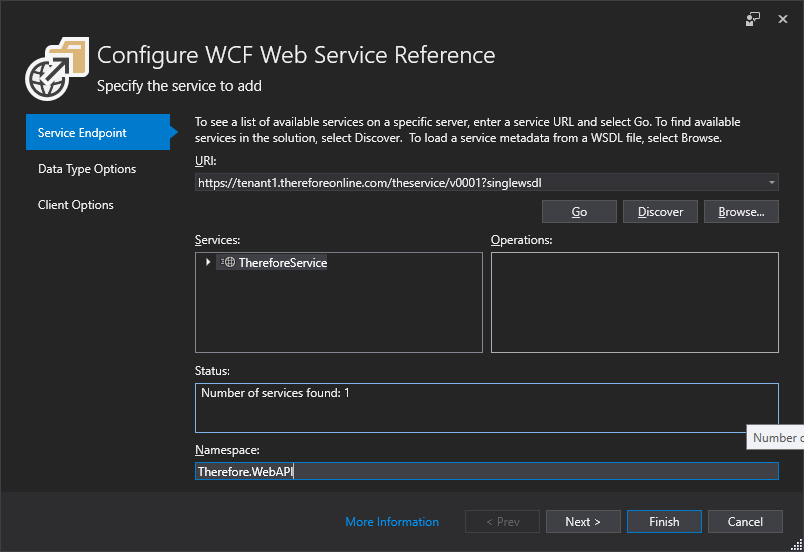
Insert the URL where the Web Service is running and press 'Go'. If the service is running, it should be listed under Services as 'ThereforeService'.
Provide a meaningful 'Namespace' like 'Therefore.WebAPI' and press Finish.
The 'Therefore.WebAPI.ThereforeServiceClient' class can be used to make Web API calls.
Please see Dependencies for additional information about 'NuGet' package 'System.ServiceModel.Http'.
Including Dependencies
To add the NuGet package 'System.ServiceModel.Http', right click on your project and select 'Manage NuGet Packages…'
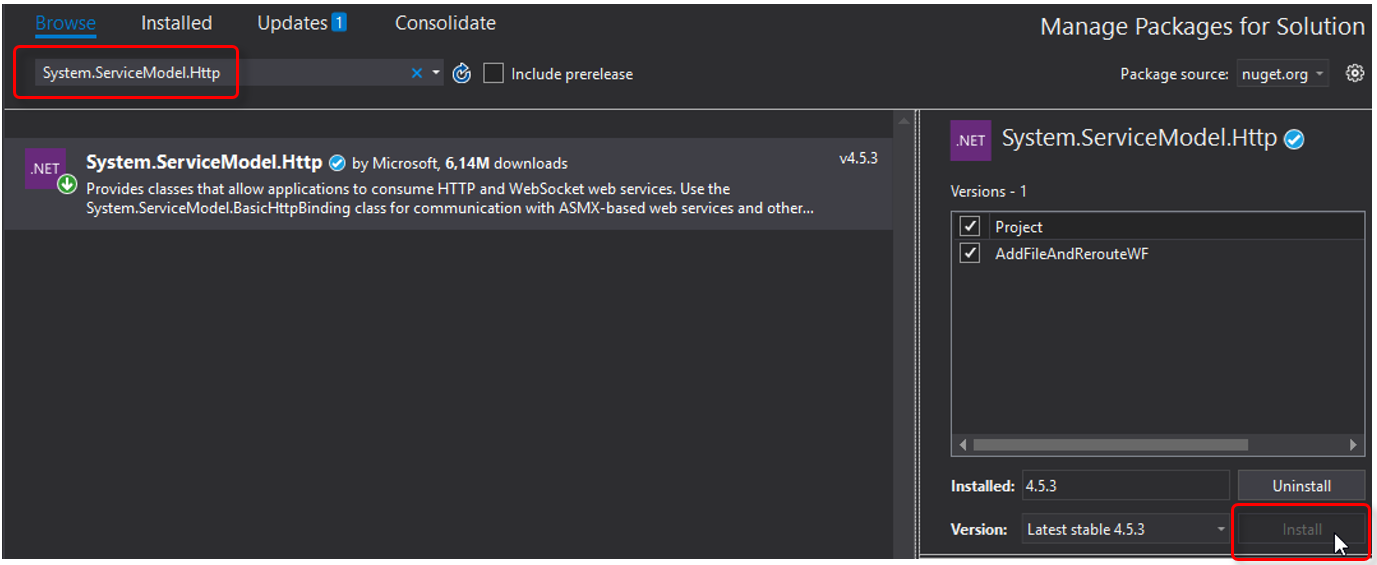
Switch to the Browse-tab and search for 'System.ServiceModel.Http', select it and click Install.
If you get the following error when building, a bug is not yet resolved:
System.IO.FileNotFoundException: Could not load file or assembly 'System.Private.ServiceModel, Version=4.5.0.3, Culture=neutral, PublicKeyToken=b03f5f7f11d50a3a'. The system cannot find the file specified.As a workaround, edit the .csproj file and add the following config as child of the “Project” root-node:
<!--this is temporary workaround for issue https://github.com/dotnet/wcf/issues/2824 also requires nuget package-->
  <Target Name="CopySPSM" BeforeTargets="Build">
    <Copy SourceFiles="$(USERPROFILE)\.nuget\packages\system.private.servicemodel\
4.5.3\runtimes\win\lib\netstandard2.0\System.Private.ServiceModel.dll" DestinationFolder="$(OutputPath)\bin" />
  </Target>
  <ItemGroup>
    <None Include="$(USERPROFILE)\.nuget\packages\system.private.servicemodel\
4.5.3\runtimes\win\lib\netstandard2.0\System.Private.ServiceModel.dll" CopyToPublishDirectory="Always" />
  </ItemGroup>
  <!--end workaround-->
Please note that version numbers and line breaks might need to be adjusted.
EmptyFunction App Sample
The EmptyFunctionApp sample is a small Azure function that retrieves the passed parameters from Therefore™, configures the WebApiClient object to be ready to use, and returns the required parameters when finished. It was designed to be used as a starting point for further development.
public static async Task<IActionResult> Run(
    [HttpTrigger(AuthorizationLevel.Function, "post", Route = "v1/Function1")] HttpRequest req, ILogger log)
{
    string errMsg = "";       // error message that will be returned to Therefore for logging
    Exception logEx = null;   // exception details for logging
    bool routingDone = false; // false: WF instance will be routed to the next task.
                              // true: WF instance will not be routed because routing was done by WebAPI call
    try…
    if (!String.IsNullOrWhiteSpace(errMsg) || logEx != null)
        log.LogError(logEx, errMsg); // log the error so it can be viewed in the Azure Portal
    TheRespParams respParams = new TheRespParams(errMsg, routingDone);
    return new OkObjectResult(respParams.Serialize());
The “Run” function is the main function that will be called on an HTTP request.
The “AuthorizationLevel” defined in the HttpTrigger will only be applied when the function is published, not for local development. When choosing “Anonymous” no key will be required, “Function” will require the function key and “Admin” will require the Function App key. The master key could be used, as well.
The “Route” defined in the HttpTrigger as “v1/Function1”, provides a way of versioning. Suppose a new workflow version would require a new version of the function, but some instances need to remain on the old one. The function could be copied and the route changed from “v1” to “v2” in the code and in the task configuration of new tasks to fulfill this need. A Function App can hold multiple functions.
At the end of the sample, any errors that might have occurred are logged to Azure and also passed to an object of class “TheRespParams”. The “TheRespParams” class takes care of converting the mandatory return parameters for Therefore™ as a JSON object.
There is always an “OkObjectResult” created, which returns the JSON object with HTTP status code 200. Any error message in “errMsg” will be returned to Therefore™ for logging in the WF history. From the Therefore™ side, the function call was successful if no error occurred (errMsg is empty).
Scripting inside the 'try'
{
    // read parameters passed by Therefore
    string requestBody = await new StreamReader(req.Body).ReadToEndAsync();
    TheReqParams reqParams = TheReqParams.Deserialize(requestBody);
    if (reqParams == null || reqParams.TheInstanceNo <= 0 || reqParams.TheTokenNo <= 0)
        return new BadRequestObjectResult("Mandatory parameter not set"); // function was not called by Therefore, return HTTP error 400
    reqParams.LogWFInfo(log); // log workflow information now, in case the function crashes later
    // configuration
    TheConfig config = TheConfig.Instance;
    config.WebAPIBaseUrl = reqParams.TheWebAPIUrl;
    config.Tenant = reqParams.TheTenant;
    // Web API connection
    WebApiClient client;
    // specify a user name and password if the permissions from the accessToken would not be sufficient
    if (!String.IsNullOrEmpty(config.UserName) && !String.IsNullOrEmpty(config.Password))
        // connection with user name and password/token:
        client = new WebApiClient(config.UserName, config.Password, config.IsToken, config.WebAPIUrl,
        config.Tenant, config.Language, config.RequestTimeout, config.ClientTimezoneIANA);
    else
        // connection with JWT Bearer token 'accessToken'
        client = new WebApiClient(reqParams.TheAccessToken, config.WebAPIUrl, config.Tenant,
        config.Language, config.RequestTimeout, config.ClientTimezoneIANA);
    // Add your code here
}
The “TheReqParams” takes care of reading all request parameters passed in from Therefore™.
The “TheConfig” class has various properties, required for the WebAPI call, like language, timezone, request timeout and many more. Those can be configured to your needs, or left at their defaults.
There are two properties without useful default values: “WebAPIBaseUrl” and “Tenant”. The values are passed in from the Therefore™ server and just need to be assigned to the “TheConfig” object.
TheConfig class will read out UserName and Password properties from “local.settings.json” when developing locally, or from the Application Settings when running in Azure.
The WebApiClient object can either be instantiated using user credentials or the JWT-token.
This is decided by checking whether they are empty or not. If no credentials are configured, the JWT-token is used.
The SendRequest function of the WebAPIClient class can be used to send a request. For a list of all available commands, please see the Web API documentation.
(insert WebAPI link)
At the “Add your code here” comment, you can make Web API requests and implement your business logic.
On failure or on success, the error or an empty string will be returned, so Therefore™ knows if the function was working as designed (outside the try/catch-statement).
Using the Web API
This documentation only explains how to send requests using the Web API in general, but does not describe each available function. Please see the Web API documentation for details on how to use the various functions.
Web API functions can be called using the Therefore.WebAPI.WebApiClient class.
Creating a new instance requires a few parameters. As described in the EmptyFunctionApp sample, the “TheConfig” object can help with those. When configuring a requestTimeout, please be aware that the function itself is called by a HTTP-request and will time out after a maximum of 230 seconds.
Credentials:
WebApiClient client = new WebApiClient(username, password, isToken, webApiUrl, tenant, language, requestTimeout, clientTimezoneIANA);JWT bearer token:
WebApiClient client = new WebApiClient(bearerToken, webApiUrl, tenant, language, requestTimeout, clientTimezoneIANA);When the WebApiClient object is created, requests can be sent using the “SendRequest” function.
Task<TResp> SendRequest<TReq, TResp>(TReq requestData)This single function can be used to cover all Web API functionality. The request is determined by the type of request- and response-parameter. Request and response need to match. For example, GetDocumentParams with GetDocumentResponse can be used to make a “GetDocument” request.
Example: Retrieving a document (with files):
Documents can be retrieved using GetDocumentParams with GetDocumentResponse in the SendRequest function.
In the GetDocumentParams request-parameter, the document number needs to be specified.
If the files of the document need to be retrieved as well, the “IsStreamsInfoAndDataNeeded” property needs to be set to true. If just the stream information, without the actual data is enough, “IsStreamsInfoNeeded” can be set to true.
// Create request parameters
GetDocumentParams parameters = new GetDocumentParams();
parameters.DocNo = docNo;
parameters.IsStreamsInfoAndDataNeeded = true;
parameters.IsIndexDataValuesNeeded = true;
// Send the request
GetDocumentResponse docResp = client.SendRequest<GetDocumentParams, GetDocumentResponse>(parameters).Result;
// Extract all file streams to the specified directory
string extractDir = Path.GetTempPath();
foreach (var streamInfo in docResp.StreamsInfo)
{
    string extractFileName = Path.Combine(extractDir, streamInfo.FileName);
    File.WriteAllBytes(extractFileName, streamInfo.StreamData);
}
The Therefore™ Interface
Response:
Every function called by the new “Call Function” workflow task needs to return a few mandatory return parameters in JSON-format in the HTTP response:
-
TheError: Mandatory string value. If the string is not empty, it will be displayed in the Workflow history. The instance will be marked as faulty, unless a retry at a later time was requested.
-
TheRetryAfterMin: Optional integer value. Can be used to request a retry from Therefore™.
If set to a value greater zero, the ‘Call Function’ task will behave like a ‘Wait’ task and send a new request after the specified amount of minutes has passed (approximately). If “TheError” is set, it will be treated as a warning and will not cause the workflow instance to be marked as faulty.
-
TheRoutingDone: Mandatory bool value, unless “TheRetryAfterMin” is specified.
Can be set to ‘true’, to indicate that routing the workflow instance was already done by the function using the “FinishCurrentWorkflowTask” Web API function. If set to ‘false’, Therefore™ will route the workflow instance to the next task. If “TheRetryAfterMin” is specified, the routing will not be done yet, so in that case it’s optional.
To simplify returning those parameters, “TheRespParams” class was created. It holds all those parameters as properties and provides the “Serialize” function for creating a JSON object.
There are two ways to initialize an object of this class:
-
Using “TheError” and “TheRoutingDone”
TheRespParams respParams = new TheRespParams(errMsg, routingDone);This should be used as default case, or if an error occurred. Both values are optional.
By default the errMsg is empty and routingDone is false.
-
Using “TheError” and “TheRetryAfterMin”
TheRespParams respParams = new TheRespParams(retryAfterMin, errMsg);This will tell Therefore™ to retry the function call at a later point in time. Integer value retryAfterMin needs to be greater than zero; errMsg is optional and will be logged as additional information (not as error) to the workflow history.
Request:
With every function call, Therefore™ sends the following parameters to the function as JSON with the HTTPS request:
-
TheWebAPIUrl: Holds the “Web API URL” server setting, which can be configured in the ‘XML Web Service’ tab or in the advanced settings. This setting will be already configured correctly when using Therefore™ Online, but can be empty if not configured.
-
TheTenant: Name of the current tenant. Will be empty if the system does not use multi-tenancy.
-
TheAccessToken: A JWT-token that can be used to connect to Therefore™ using the Web API.The token is configured to give the “$TheWFSystem” user, access to the document or case associated with the current WF instance, as well as access to the current WF instance and token. With the granted permissions, it is possible to make changes to the associated document, case, or documents associated to the case. The granted permissions should also allow routing the workflow instance to a different task. It is not allowed to create new documents or cases, or to run queries. It is also not allowed to delete the main case or document associated to the workflow instance, or the workflow instance itself.
-
TheInstanceNo: Instance number of the current workflow instance.
-
TheTokenNo: Token number of the current workflow instance.
-
TheCaseNo: Case number of the case associated to the workflow instance. This parameter is only available for case-workflows.
-
TheDocNo: Document number of the main document associated to the workflow instance. This parameter is only available for document-workflows.
-
TheSettings: JSON object (passed as string) of all configured ‘Custom function settings’.
This can be empty or used to pass additional parameters to the called function. Name and value of each setting can be chosen freely, but names need to be unique according to the JSON specification. All values are treated as string values and need to be converted to another type inside the function if required.
To simplify reading those parameters from the JSON string, “TheReqParams” class was created. It holds all those parameters as properties and provides the “Deserialize” function for creating an object from a JSON string.
The code of “TheReqParams” class can be used as an example for your custom settings.
Suppose you configured “TaskNo” with some integer value in the workflow task configuration as “custom function setting”, you could use the following class to read it.
class CustomSettings
{
    public string taskNo;
    public int TaskNo
    {
        get { return int.Parse(taskNo); }
        set { taskNo = value.ToString(); }
    }
    public static CustomSettings Deserialize(string json)
    {
        return JsonConvert.DeserializeObject<CustomSettings>(json);
    }
}
Specifying a username and password for Web API Connection
The code in the sample project will primarily check if user name and password have been specified, and only use the provided access token as a fallback. This way the default will be the token unless you specify user name and password. Those credentials can be needed if more permissions are required than the token provides.
TheConfig.cs uses the ConfigurationBuilder to access both the “local.settings.json” and the environment variables to look for the configuration.
When running the Azure function locally, the setting will be read from “local.settings.json”. To add the setting, insert the settings “WebAPIUser” and “WebAPIPassword” to the “Values” JSON-object like this:
{
    "IsEncrypted": false,
  "Values": {
    "AzureWebJobsStorage": "UseDevelopmentStorage=true",
    "FUNCTIONS_WORKER_RUNTIME": "dotnet",
    "WebAPIUser": "Domain\\TestUser1",
    "WebAPIPassword": "secretpassword"
  }
}
When the function has been deployed to Azure, the settings will be read from the App Settings.
To add user name and password, select your Function App in the Azure Portal and click “Application settings”. New settings can be added by clicking “New application setting”.
Click “Save” when done.
Deploying an Azure function
Azure functions can be deployed to the Microsoft Azure platform directly within Visual Studio.
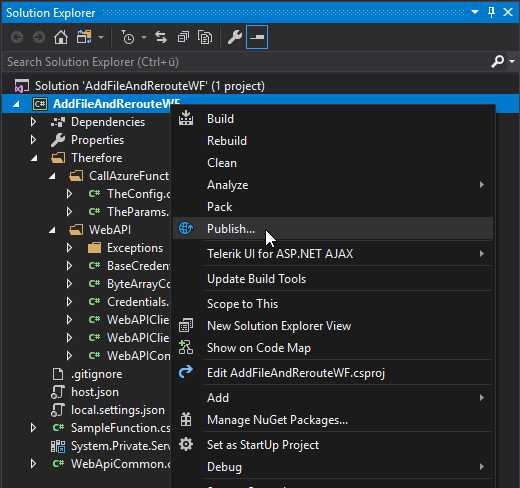
Right click the project and click “Publish” to publish your Azure function.
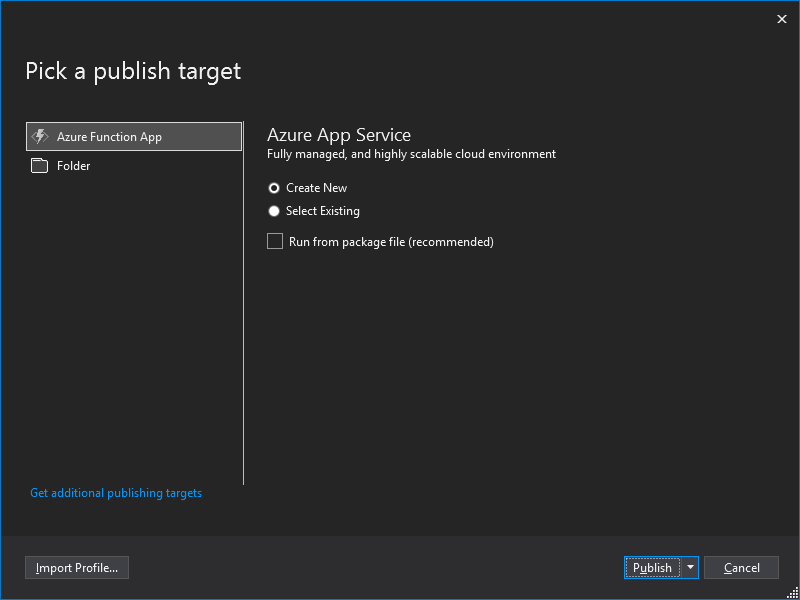
Select “Azure Function App” to upload it to Azure, directly from within Visual Studio.
Choosing “Folder” would require you to upload it manually using FTP.
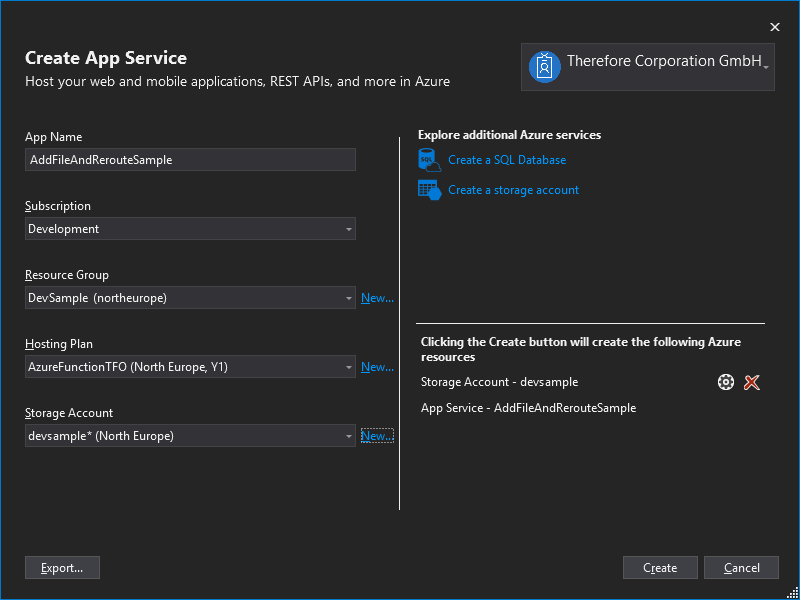
The Function App name needs to be globally unique, as a small website “https://FunctionAppName.azurewebsites.net” is created that is publicly available, regardless if the function is HTTP triggered or not (the HTTP trigger will use the same URL).
Every Azure Function App needs to have a Storage Account where the functions as well as logs can be stored.
There are two different options to host a Function App:
-
Consumption Plan
The Consumption plan automatically allocates computing power when your code is running. Your app is scaled out when needed to handle load, and scaled down when code is not running. You don't have to pay for idle VMs or reserve capacity in advance.
Billing is based on number of executions, execution time, and memory used.
A consumption plan is designed for short running functions. The default maximum execution time is 5 minutes and can be increased to 10 minutes. (Note that HTTP triggered functions have a 230 second timeout, regardless of the configured execution time).
-
App Service Plan
In the dedicated App Service plan, your function apps run on dedicated VMs on Basic, Standard, Premium, and Isolated SKUs, which is the same as other App Service apps. Dedicated VMs are allocated to your function app, which means the functions host can be always running.
A VM decouples cost from number of executions, execution time, and memory used. An App Service Plan can be more cost-effective if your function apps run continuously, or nearly continuously.
After a successful deployment, calling the function will result in a 401 “Unauthorized” error.
By default, a function key is used for authorization that needs to be provided with every call.
This key can be obtained from the Azure Portal.

After opening the Function App, click on “Manage” and copy the “default” key.
A call from Therefore™ will include they key as “x-functions-key” in the request header if configured.
Testing the successful deployment without Therefore™ can be done by using cURL or a similar program.
curl –d “” –i –X POST “https://AppName.azurwebsites.net/api/Route?code=FunctionKey”If no route is defined, the function name is used instead.
Developing a new Azure function using Visual Studio Code
Visual Studio Code can be used as an alternative to Visual Studio. It supports creating a new Azure function from scratch, or using one of our samples as well as local debugging without the need for an Azure subscription. For more details please visit the guide from Microsoft:
Create a C# function in Azure using Visual Studio Code
Prerequisites that need to be downloaded and installed:
-
Microsoft .Net Core SDK.
For Azure functions using version 2, the .NET Core 2.1 SDK is needed.
For Azure functions using version 3, the .Net Core 3.1 SDK is needed.
-
Microsoft SQL Server Express (for Azure Storage Emulator)
A restart is required, run the setup again if it does not start automatically. If a non-Express version of SQL Server is already installed, this step can be skipped.
- Azure Storage Emulator
- C# Extension for Visual Studio Code
- Azure Function extension for Visual Studio Code
Setting up the Azure Storage Emulator
When creating a new Azure function in VS Code, no storage is used by default. It can be enabled by adding the following lines to the local.settings.json:

Please be aware that VS Code does not support trailing commas.
In contrary to Visual Studio, VS Code does not start the Storage Emulator automatically, so it needs to be started manually before debugging / running your function.
Start development based on our SDK samples
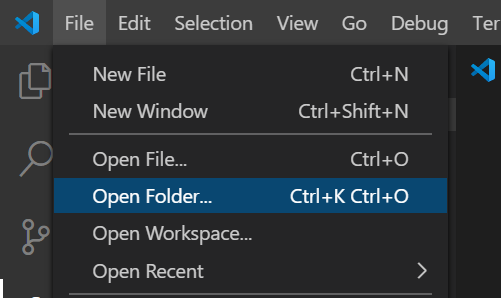
Start VS Code, click on “File -> Open Folder…” and specifying the folder containing one of our SDK samples, e.g. EmptyFunctionApp folder that contains the EmptyFunctionApp.sln.
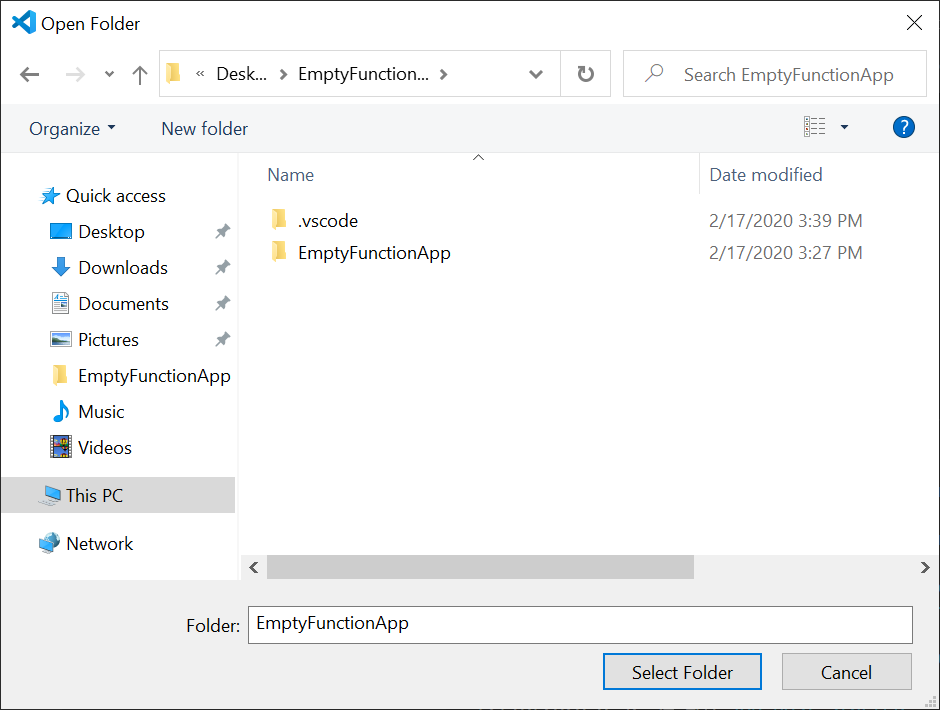
Please note that the .sln files will be hidden in this dialog.
After opening a sample in VS Code, there might be some notifications.
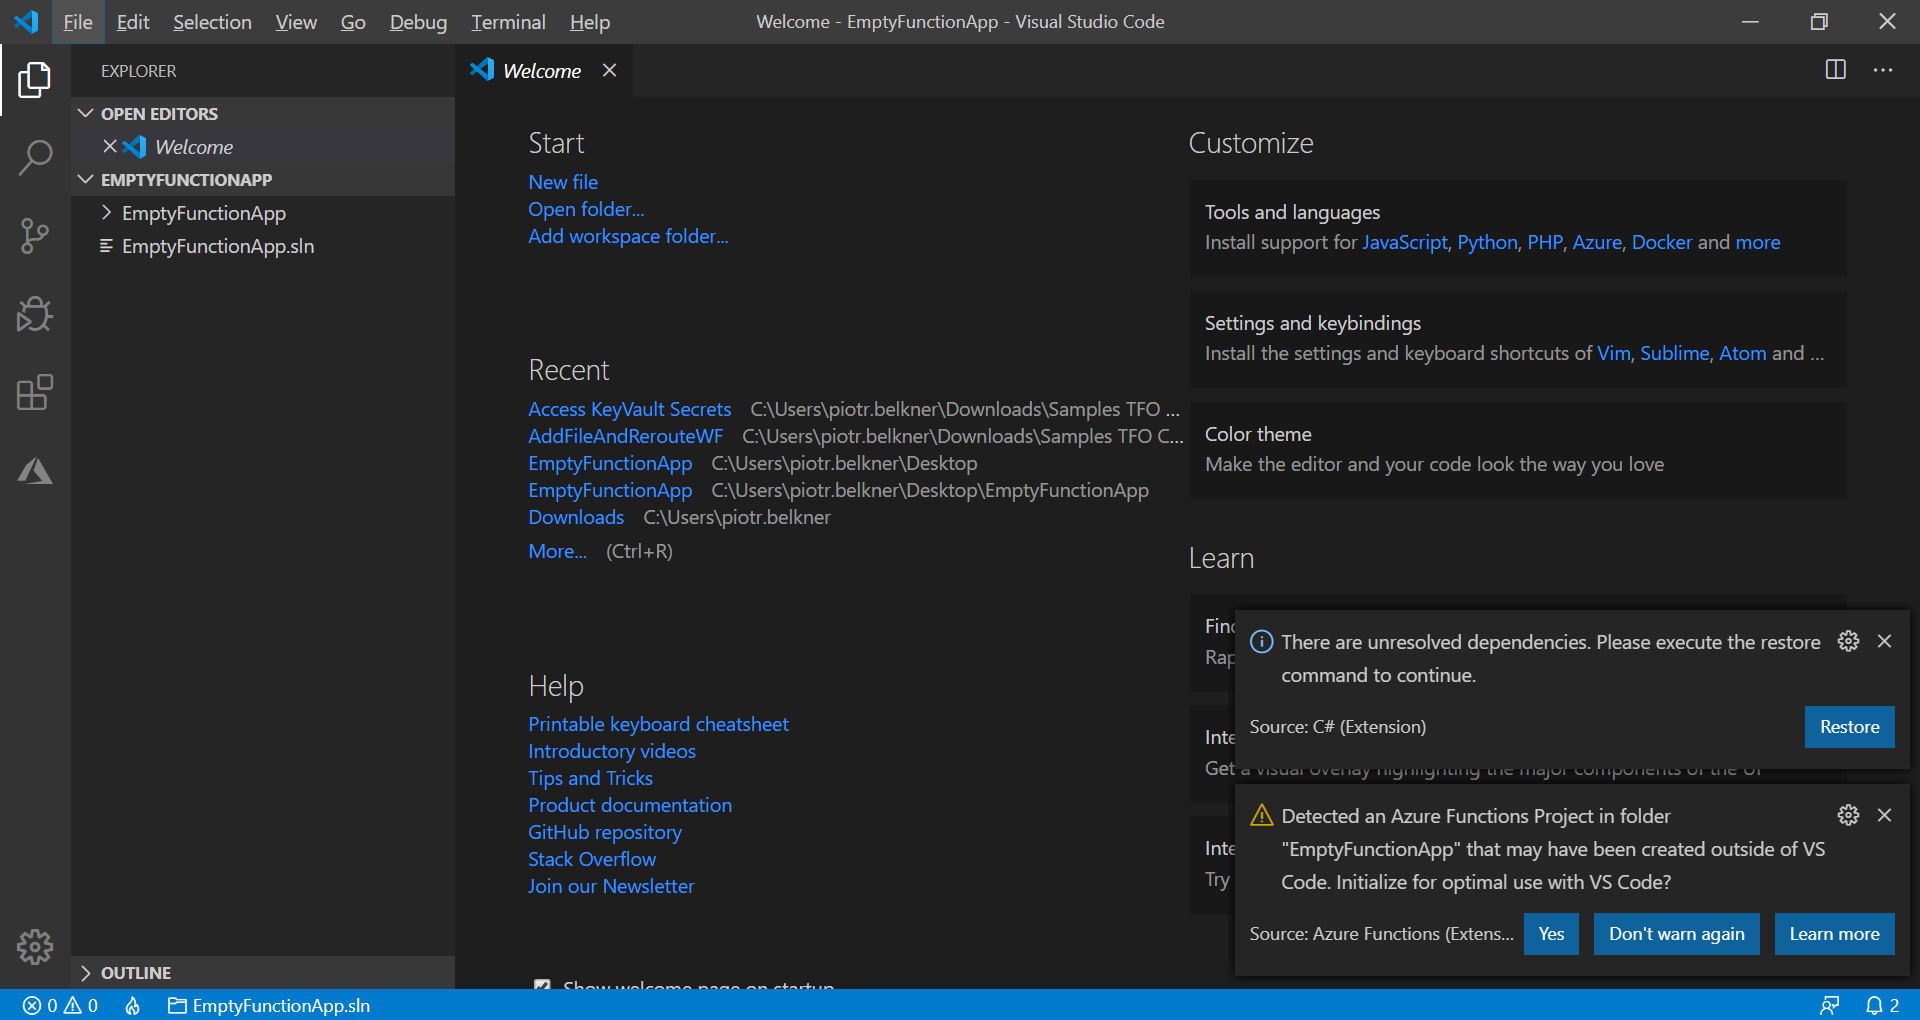
If there are any unresolved dependencies, click on “Restore” to resolve those.
If “Detected an Azure Function Project… that may have been created outside of VS Code.” is show, click “Yes” and wait for VS Code to finish configuring environment.