Print List Customizing
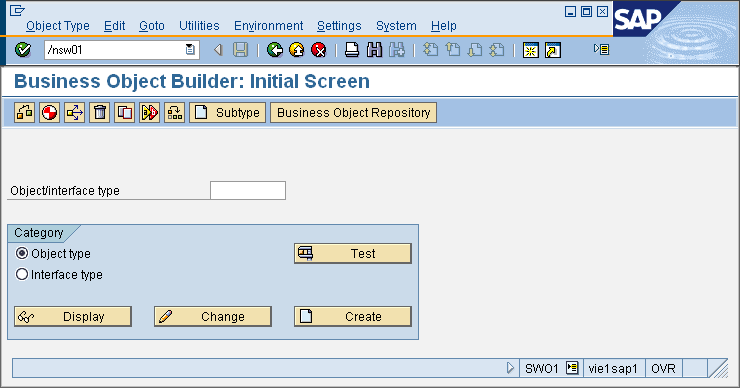
Call Business Object Builder
The Business Object Builder is a tool for creating and processing business object types. It can be used for:
-
Direct access to the definition of an object type,
-
Checking or generating the business object type,
-
Creating a where-used list as well as
-
Subtypes for an existing business object type.
Business object types form the point of entry to the data and the functions of an SAP NetWeaver System. At business object type level, other systems can communicate with an SAP NetWeaver System, and the various SAP NetWeaver business components can communicate with each other.
Navigate to the Print List Customizing folder and then click the Activity icon for Call Business Object Builder (or right-click and choose Maintain Activity from the context menu).
Print lists are linked to object types in the same way as incoming and outgoing documents. The link is for organizational reasons and not related to content. It is used as a search criteria, so you can use object types to search for print lists.
For information on creating object types, choose the following in the SAP Library.
For Business Object Types, see:
http://help.sap.com/saphelp_nw04/helpdata/en/5a/ccb4c5808311d396b40004ac96334b/content.htm
For technical information see documentation SAP Web Application Server -> Business Management -> SAP Business Workflow -> Reference Documentation Documentation -> SAP Business Workflow Navigation -> Business Object Builder.
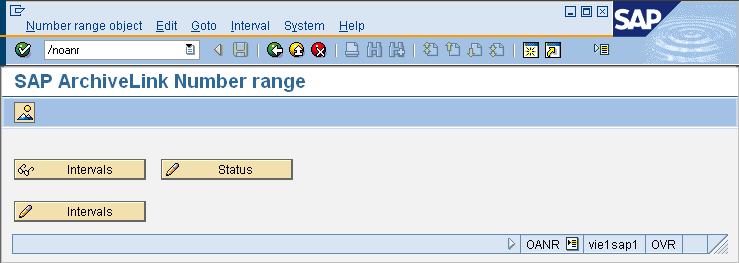
Maintain Number Ranges
Number Ranges intervals are generally defined in the SAP NetWeaver System, but can be edited.
Navigate to the Print List Customizing folder and then click the Activity icon for Maintain Number Ranges (or right-click and choose Maintain Activity from the context menu). To display a number range click the Display Intervals button. To change a number range click the Change Intervals button. To display the status press button DISPLAY STATUS.
Create Queues
In this customizing activity you create queues and specify the queue administrator (e. g. CARA Queue, the queue in which the spool writes the storage requests).
Navigate to the Print List Customizing folder and then click the Activity icon for Create Queues (or right-click and choose Maintain Activity from the context menu).
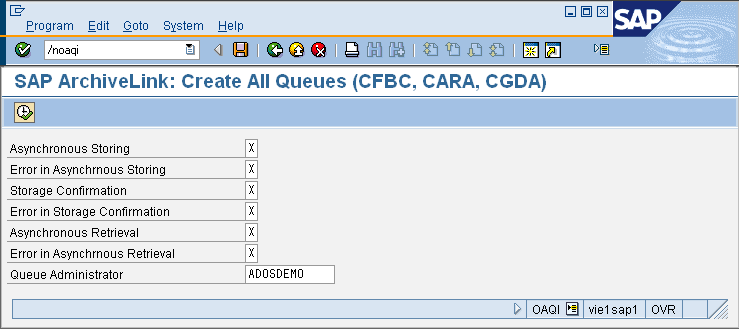
You now should create queues for the following functions:
Asynchronous storage (CARA-Queue)
Error in asynchronous storage (CARA_E-Queue
Storage confirmation (CFBC-Queue)
Error in storage confirmation (CFBC_E-Queue)
Asynchronous retrieval (CFBA-Queue)
Error in asynchronous retrieval (CFBA_E-Queue)
You can also define a queue administrator. After definition the queue is visible in the ArchiveLink Monitor OAM1.
Please press button EXECUTE or press F8 to save the settings.
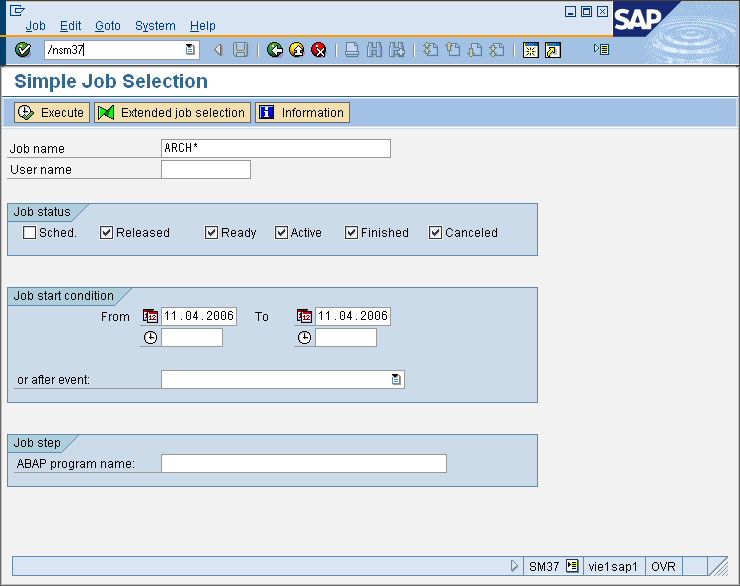
Schedule Storage Job For Print Lists
You use this customizing activity to schedule the job ARCHIVELINK, which is required for processing the queue. The job ARCHIVELINK periodically checks whether the queues contain entries, the frequency of the check depends on the customizing. If the queues have entries, ARCHIVELINK calls the jobs for processing the queues. Note that the job is only scheduled during normal system operation if it does not interfere with this. For performance reasons, it is not recommended to schedule jobs more frequently than every fifteen minutes. You must already have created the queues.
Navigate to the Print List Customizing folder and then click the Activity icon for Maintain Number Ranges (or right-click and choose Maintain Activity from the context menu).
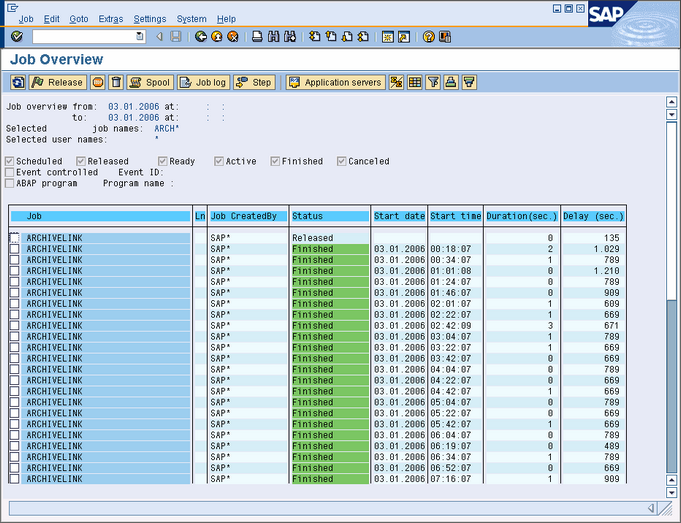
Click SYSTEM -> SERVICES -> JOBS -> JOB OVERVIEW in the menu. Type ARCH* in the input field JOB NAME. Check all check boxes in the JOB STATUS frame. In the JOB START CONDITIONS frame please select a time frame. Press button EXECUTE or press F8 to display the result list dialog.
Edit Logical Output Device
You use this customizing activity to create a logical output device. You need to carry out this step before you can store print lists in a storage system. The output device is the logical printer to which the spool sends the storage requests.
Navigate to the Print List Customizing folder and then click the Activity icon for Edit Logical Output Device (or right-click and choose Maintain Activity from the context menu).
-
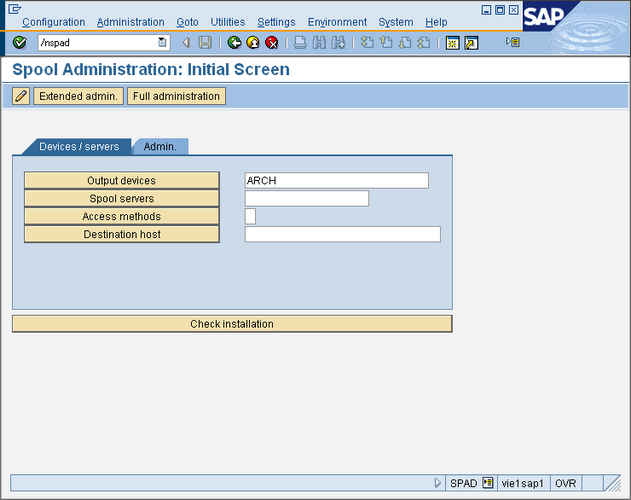
In the input filed next to the button OUTPUT DEVICES please type in ARCH. Click the button OUTPUT DEVICES to display a detailed overview about the device.
-
Press the button EDIT to change the device settings. Please choose ARCHLINK: SAP ArchiveLink Archiver from the list in the field DEVICE TYPE. Please select a SPOOL SERVER from the list of available systems. For the DEVICE CLASS please select ARCHIVING PROGRAM from the list. Type in a LOCATION title. Save the device settings by pressing the button SAVE. Generate a transport ticket by pressing CTRL-F3 or press the button TRANSPORT.
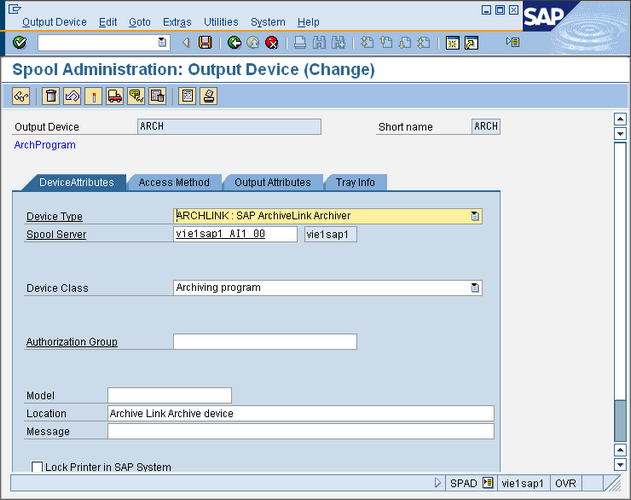
The device type determines the storage format. The storage format is also determined by the profile parameter rspo/archive_format. The profile parameter determines the general appearance, and the device type determines the exact appearance of the print list to be stored.
You can determine the current settings of the profile parameter rspo/archive_format using the report RSPARAM. Only the system administrator can change the setting. You can implement two storage formats using the profile parameter rspo/archive_format:
-
Format 1 (standard setting): Contains ASCII characters and line and form feed as control characters.
-
Format 2: Contains print controls, columns, commentary, and DARC index lines. The list has the same appearance as normal online list output.
For creating print lists that contain color information and/or hyperlinks, the profile parameter rspo/archive_format must be set to format 2.
You can create a new output device and a new device type. Use the default settings for the output device ARCH and the device type ARCHLINK as a guide. For the procedure for creating an archive device and device type, see the SAP Library under Documentation BC - Printing Manual in the section Defining and Modifying Device Types.
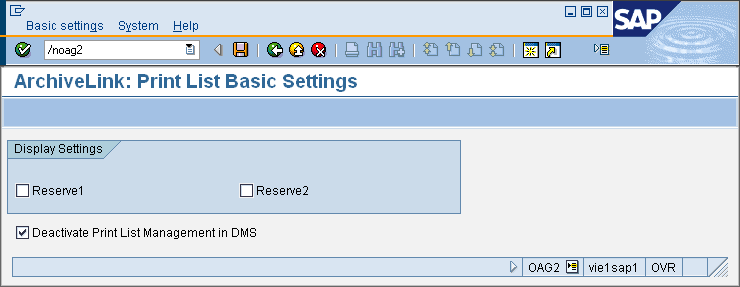
Activate/Deactivate Print List Management in DMS
You use this customizing activity to determine whether a print list management record is created in the Document Management System (DMS) when you store a print list. The DMS is connected to the SAP NetWeaver classification. If a print list management record is created, you can assign the print list attributes of your choice, and use these attributes for searching.
Navigate to the Print List Customizing folder and then click the Activity icon for Activate/Deactivate Print List Management in DMS (or right-click and choose Maintain Activity from the context menu). If you set the flag, you deactivate the creation of a print list management record in the DMS when storing a print list. If you do not set the flag, a print list management record is created in the DMS. Press the button SAVE to save all changes.
See also: