Administration
The menu item Administration contains the main functions for individual customization of the interface.
Base Setup
In the base setup, general settings can be configured for tenants, logging, and viewing options. On the other hand, settings for automated synchronization can be made in the NAS register.
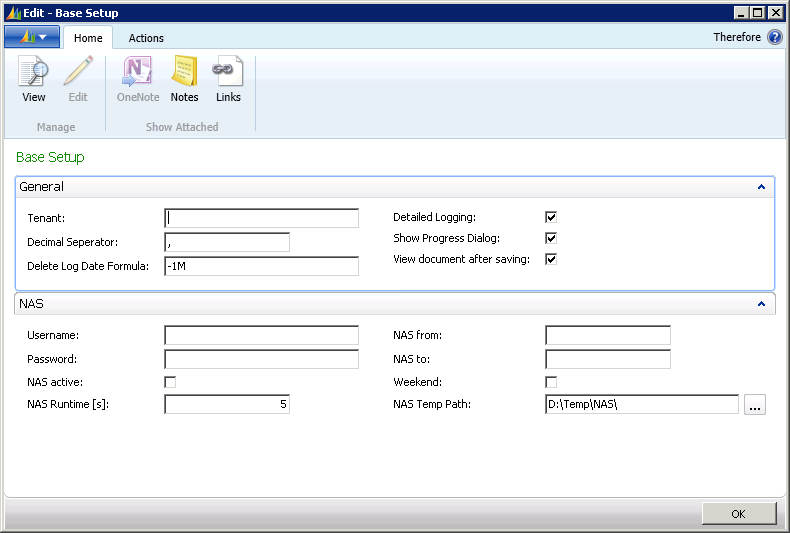
General
Tenant
Tenant’s name in the Therefore™ archive.
Decimal separator
Required for formatting.
Delete log date formula
Date formula (NAV) time period after which events should be deleted from the log.
Detailed logging
Records everything, when activated.
Show progress dialog
On-screen display during synchronization, when activated.
View document after saving
Scanned documents are immediately displayed, when activated.
NAV Application Server (NAS)
Username and password
Registration data for the Therefore™ archive.
NAS active
Activate or deactivate the NAV Application Server.
NAS runtime
Loop in seconds – when NAS is to be run again.
NAS from/NAS to
Time period that NAS runs for, when activated.
Weekend
When selected, the NAS will always run on weekends, irrespective of from/to.
NAS Temp Path
Is required on the computer running NAS in order to create PDFs.
Synchronize Configuration
The synchronise configuration function enables update of customer specific settings concerning the categories and index words of Therefore™ affected by such a synchronization. This setting can be made in the tables menu item and is explained under the section on Tables. See:
Mapping
The mapping list shows the mapping of the NAV data structure (tables and fields) with the Therefore™ archive (categories and index fields). The list in figure 6 shows an overview of currently implemented mapping. These hold data concerning customers and vendors as well as data on sales and purchases (incoming invoice, outgoing invoice and delivery note). The Activated box can be set so that the mapping list is principally activated and taken into consideration during synchronization.

Each of these allocations contains specific settings regarding synchronization and mapping between NAV and Therefore™. These settings can be configured by double-clicking the relevant line. The exact settings of the mapping are explained in detail in the following section (application scenarios). By using these example application scenarios, experienced users with knowledge of the NAV and Therefore™ data structure will be able to create their own mappings. To do this, the New button needs to be selected. By following the examples listed below, the specific allocations and synchronization settings can be implemented.